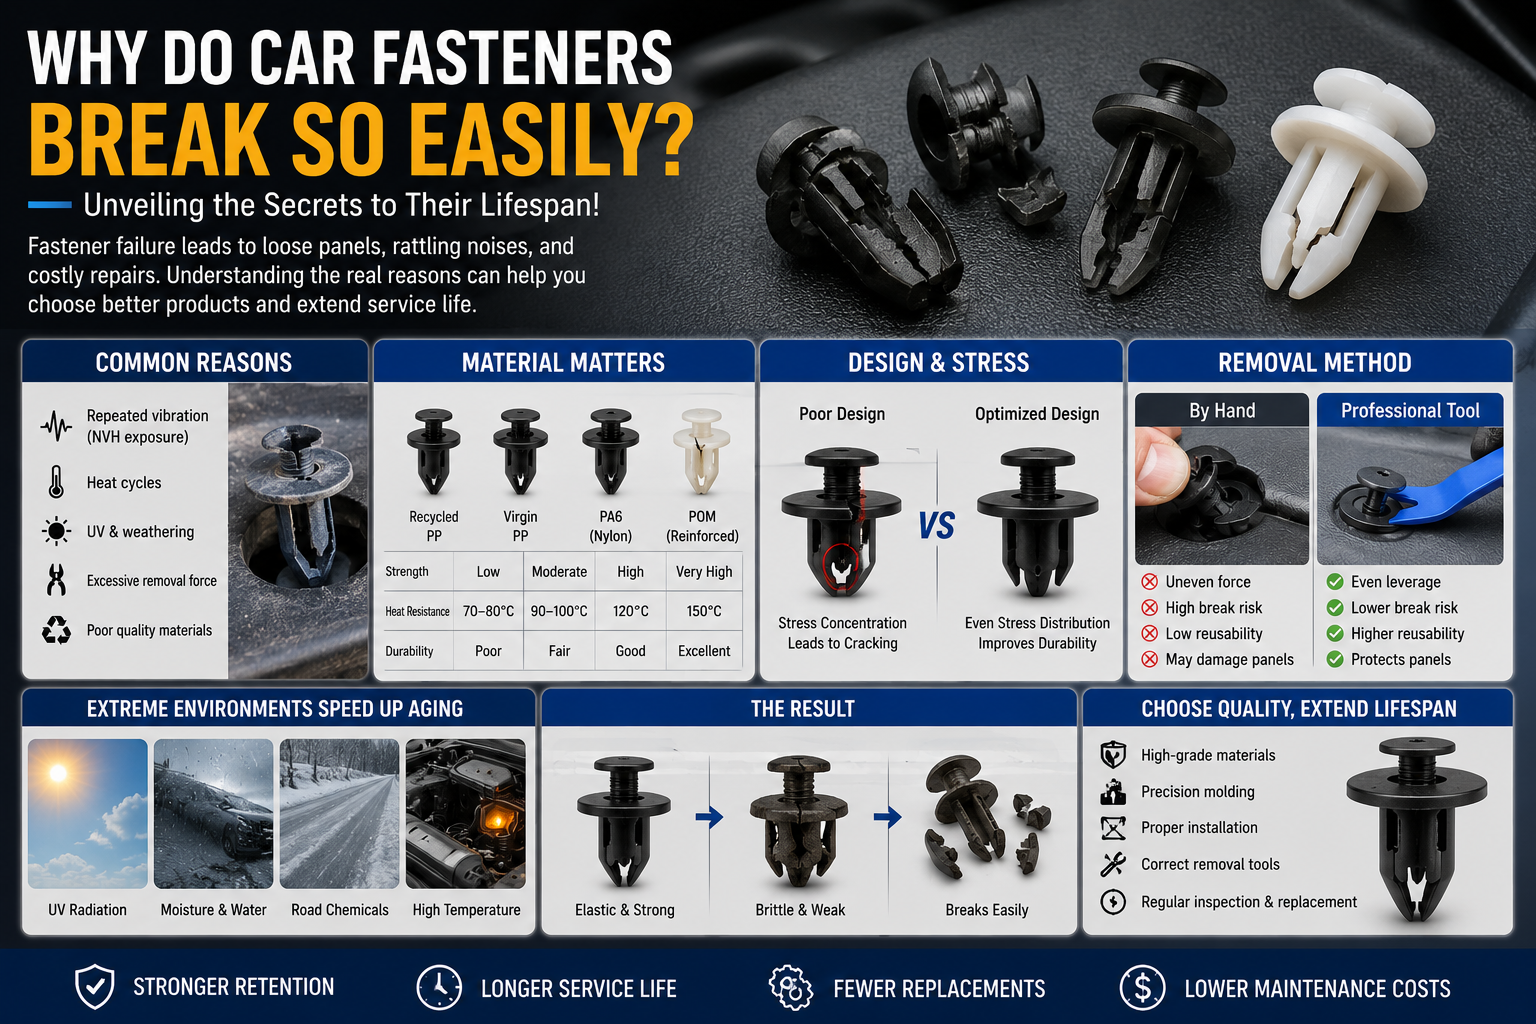
Automotive clips rarely fail dramatically. They fatigue quietly. A door panel begins to loosen. A bumper edge starts vibrating at highway speed. A dashboard produces intermittent rattling under temperature changes.
In many service workshops, clip replacement is treated as a trivial task. It is not. According to SAE interior NVH research summaries, up to 30% of cabin noise complaints originate from fastening system degradation rather than structural components.
From the perspective of an experienced Automotive Clips manufacturer, replacing a damaged clip is not just removal and insertion. It requires understanding load behavior, material fatigue, and panel compatibility.
Why Automotive Clips Fail in the First Place
Before replacing, diagnose the failure mechanism. Otherwise the new clip may fail again.
Common causes include:
-
Thermal cycling beyond 120°C in engine zones
-
UV degradation in exterior applications
-
Excessive insertion force due to wrong diameter
-
Panel hole ovalization after repeated removal
-
Material embrittlement below –20°C
Glass-fiber reinforced PA66 can withstand higher stress, but standard PA6 may lose up to 25% retention strength after prolonged heat exposure.
Failure is rarely random. It is usually systemic.
Understanding Retention Mechanics Before Replacement
Automotive clips rely on elastic deformation and barb expansion. When inserted, the legs compress; once past the panel thickness, they expand and lock.
Retention force depends on:
-
Barb angle (typically 12°–18° for interior clips)
-
Shaft diameter tolerance (±0.03 mm recommended)
-
Material modulus (2.5–3.2 GPa for PA66)
-
Panel thickness compatibility (within 0.2 mm variance)
If the hole diameter has worn beyond tolerance, simply installing a new identical clip will not restore original holding strength.
An experienced Automotive Clips manufacturer evaluates both clip and receiving structure before recommending replacement.
Standard vs Correct Replacement Approach
| Practice | Quick Replacement | Professional Replacement Method |
|---|---|---|
| Hole Inspection | Ignored | Measured with caliper |
| Panel Condition | Not assessed | Checked for deformation |
| Material Match | Random | Heat/UV matched to zone |
| Retention Test | None | Manual pull validation |
| Reuse Decision | Reused if intact | Replaced if fatigued |
The difference determines long-term stability.
Step-by-Step Technical Replacement Procedure
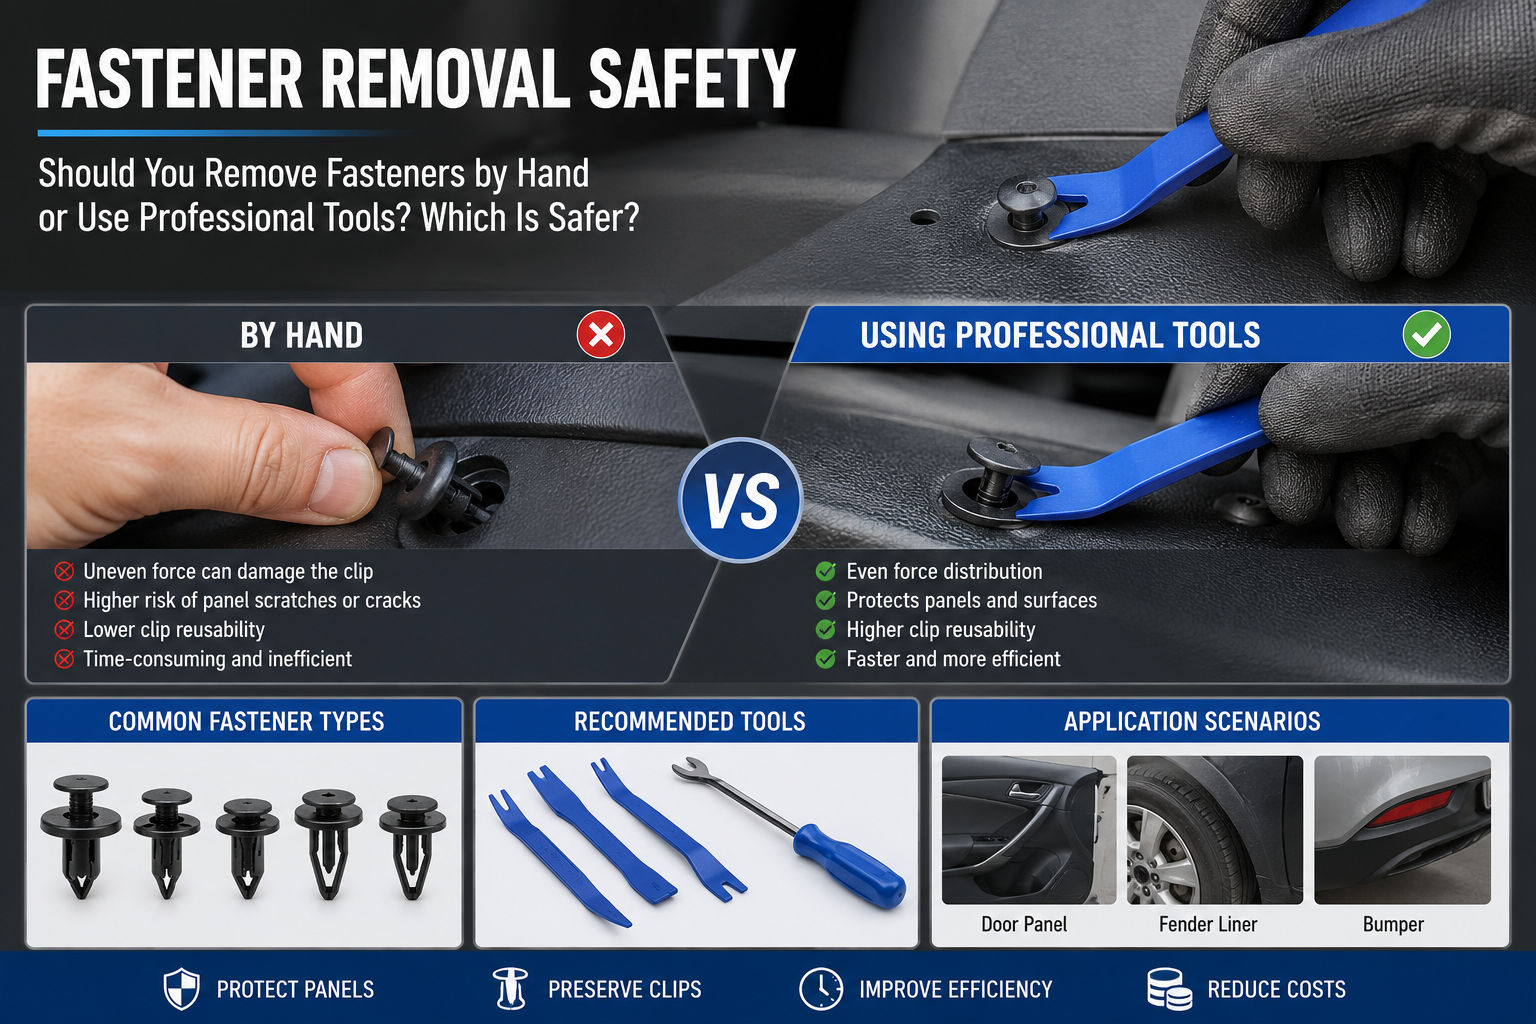
Step 1: Remove Without Secondary Damage
Use a proper trim removal tool. Avoid flat screwdrivers that concentrate force and enlarge the mounting hole.
Step 2: Inspect Panel Opening
Measure hole diameter. Standard 8 mm clip holes should remain within 8.0 ±0.1 mm. If enlarged beyond 8.3 mm, consider upsized or expansion-type replacement.
Step 3: Identify Original Clip Type
Push-type, expansion rivet, or screw-type? Mixing types compromises retention behavior.
Step 4: Select Material According to Zone
Interior trim: PA66 standard
Exterior bumper: PA66 + GF10–30
Engine area: heat-stabilized nylon or hybrid insert
Step 5: Validate Retention Force
After installation, apply manual tensile check. Target retention:
-
Interior trim: 180–220 N
-
Bumper: 220–260 N
Step 6: Perform Noise Check
Drive test or vibration simulation if possible.
Proper replacement is validation-driven, not assumption-driven.
When Replacement Requires Upgrade Instead of Like-for-Like
In fleet maintenance or high-vibration vehicles, upgrading clip material reduces repeat failure.
Example scenarios:
-
SUV tailgates subjected to frequent closing impact
-
Commercial vans exposed to heavy cargo vibration
-
High-temperature climates exceeding 45°C ambient
Switching from PA6 to PA66 GF can increase long-term retention stability by up to 35% under cyclic load conditions.
This is where engineering consultation matters.
How QEEPEI Supports Aftermarket Replacement Stability
QEEPEI provides:
-
Mixed model replacement kits
-
UV-stabilized exterior-grade clips
-
Batch tensile testing reports
-
Serialized packaging for traceability
-
IATF 16949 compliant production
As an Automotive Clips manufacturer, QEEPEI designs replacement solutions based on lifecycle durability—not just dimensional replication.
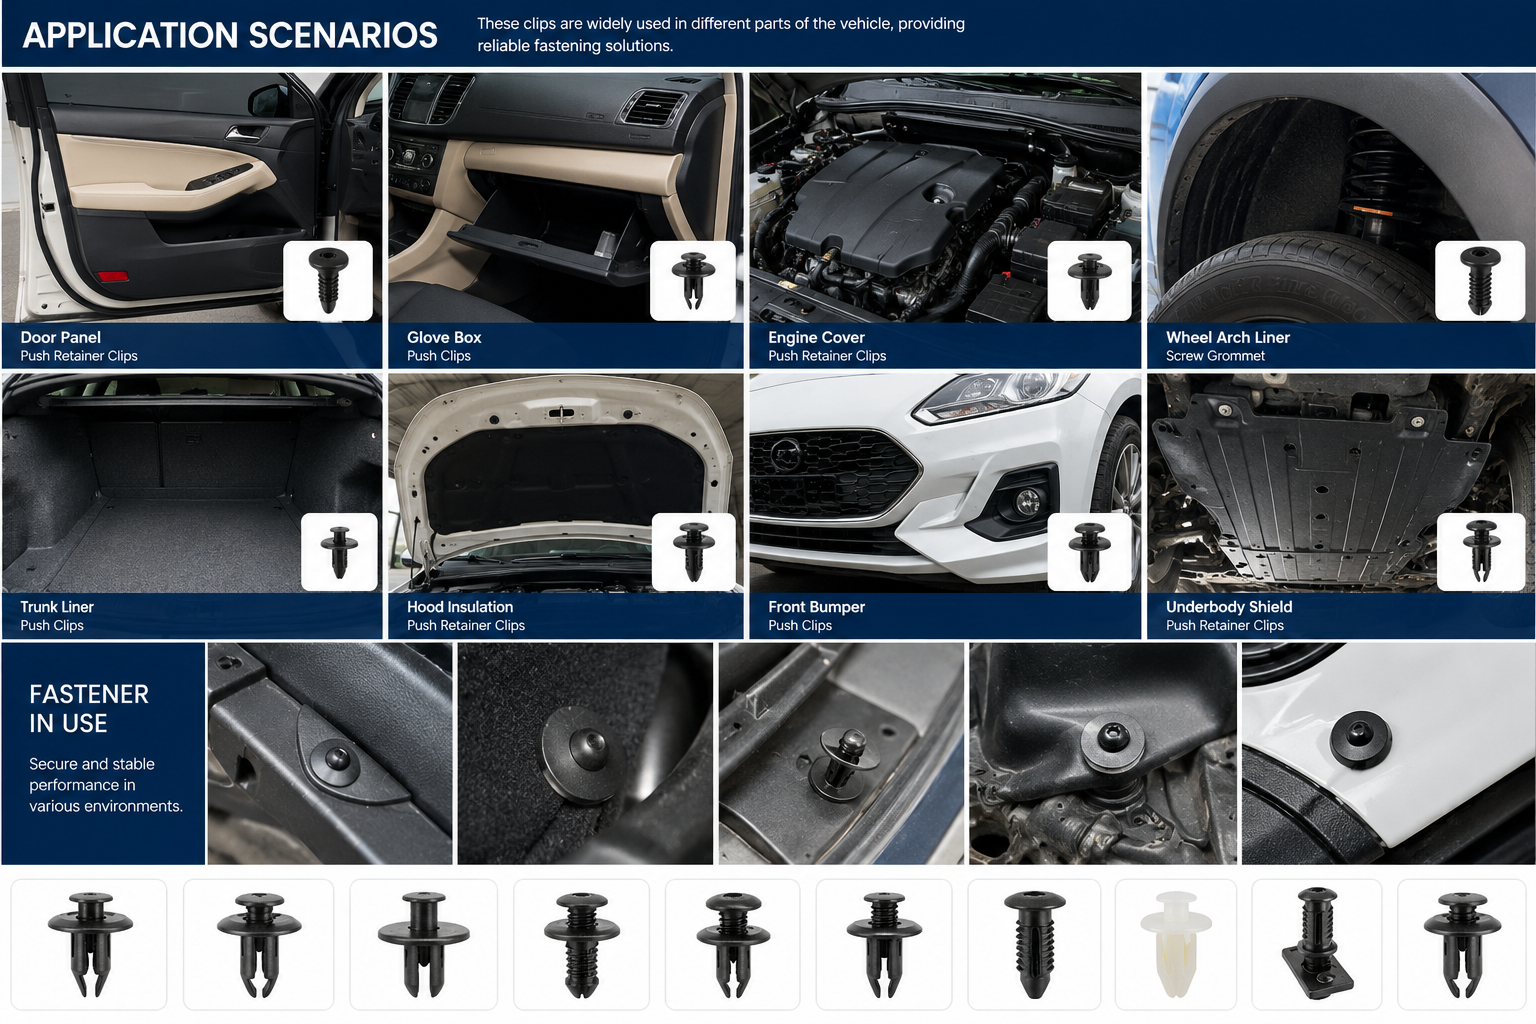
Selection Guide Based on Vehicle Application
| Vehicle Area | Recommended Clip Type | Upgrade Suggestion |
|---|---|---|
| Door Panel | Push-type retainer | Standard PA66 |
| Bumper | Expansion rivet | PA66 + GF10 |
| Engine Bay | Hybrid insert clip | Heat-resistant nylon |
| Underbody Shield | Screw-type fastener | POM reinforced |
Selecting correctly reduces repeat repair frequency.
FAQ – Replacement Concerns That Matter
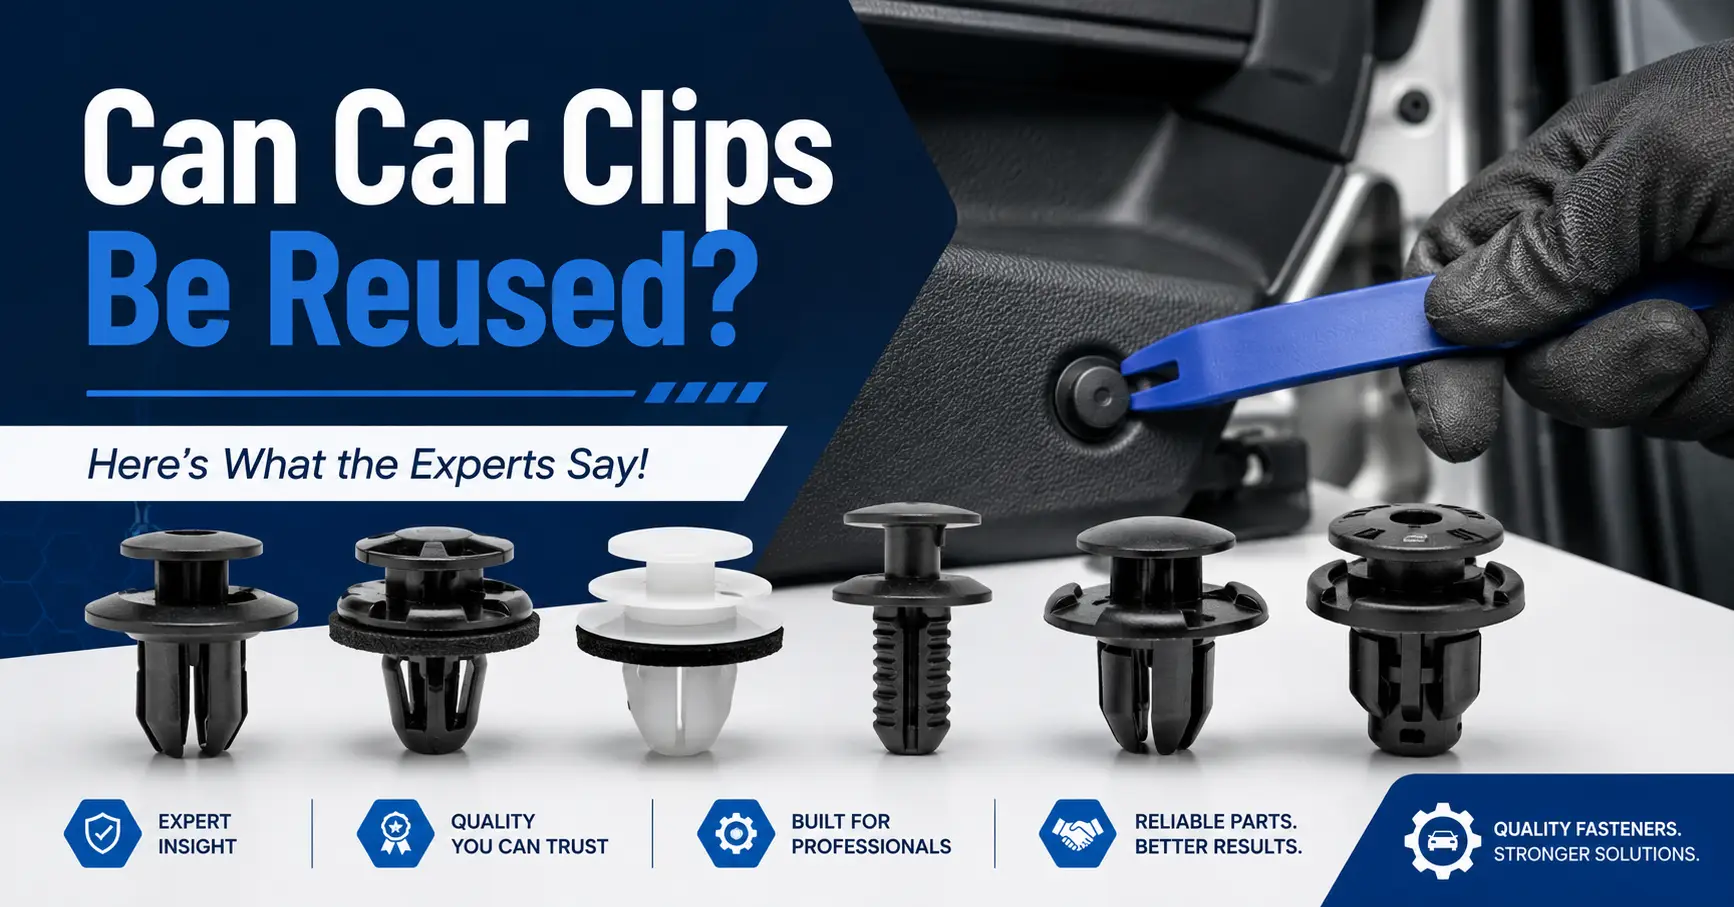
Q: Can automotive clips be reused?
A: Generally not recommended. Fatigue micro-cracks reduce retention reliability even if visually intact.
Q: How to know if hole damage requires oversize clip?
A: If diameter exceeds original spec by >0.3 mm, consider expansion design.
Q: Are replacement clips regulated?
A: Automotive suppliers typically operate under IATF 16949 quality systems; material compliance should meet REACH/RoHS requirements.
Conclusion: Replacement Is a Structural Decision
Replacing a damaged automotive clip is a small operation with structural consequences.
Ignoring material grade, retention mechanics, and panel condition invites repeat failure.
A qualified Automotive Clips manufacturer ensures that replacement clips meet thermal, mechanical, and durability standards required for modern vehicles.
With certified production systems and validated tensile testing, QEEPEI provides stable aftermarket and OEM-grade fastening solutions.
For technical specifications or cooperation:
https://www.cnclip.com/
https://www.cnclip.com/contact-us